Please note that when you add a job, which is for an animal or a group of animals please include this in the Job Name. For examples:
- Treatment for a single animal, then include the animal’s name -> Alfie needs hofs trimmed
- Treatment for a group of animals -> Dogs need Tick treatment
Sometimes you might want to schedule repairs, maintenance or works required before your next rego renewal. What you want to do here is simply add a reminder you your workshop calendar.
To do so click [Dashboard] > click “Add New” Tab and enter the required details. You will also receive an email, automatically 7 days before the date you’ve scheduled this task for.
To record any costs associated with a log entry you need to enter this as an Input (expense). It is the same form that is used for all other farm operations however only the fields relevant for a log entry will display after you choose “Log Book” from the “Account” drop down.
Click here to display our Request Support form, fill this in and we’ll be in touch as soon as we can, usually within a business day.
Navigating our website and around the Wolf Rural Small Livestock Farm Management Application (WRFM) is obviously crucial to how you use and get the most out of WRFM. Please note that at this stage the application is optimised for use with a desk top computer, notepad or ipad. Your can use the site from a smartphone but it’s not quite as user friendly on the small screen.
Finding Wolf Rural and Logging In
In your favorite browser type into the address bar: wolfrural.com.au
and you should arrive at the Wolf Rural website, please see picture to the right. Once you have arrived please click “Login” right-hand side, at the top of the screen and on successful login you’ll be taken to your Dashboard.. If it reads “Logout” instead of “Login” then you are already logged in, so simply click on “Dashboard” to be taken there. BTW you can click on any of the image to see a larger version in a light box.
Should you encounter any difficulties then please contact Carol for support here.
Navigating WRFM
Once you have logged in you’ll arrive at your Dashboard, which looks something like this (note there are frequent changes happening at the moment). See second image to the right ->
On all of the application screens is a menu in the left column. From the Dashboard you can navigate to the main screens eg Farming Operations (FarmOps) etc. The last menu item is normally “Help”, click that to return to this section to read about how to use the different cards etc. If at any time you feel that you’re lost then click on “Dashboard” at the top of the screen.
Each major function you use, we like to call them cards, function in a very similar manner, have a look at the third image down, on the right ->
Please note that the tabs give you access to a list or table of all the cards you have and the second tab can be used to add a new card. From the table view you can also click “Edit” to edit any of your cards.

Login and Dashboard
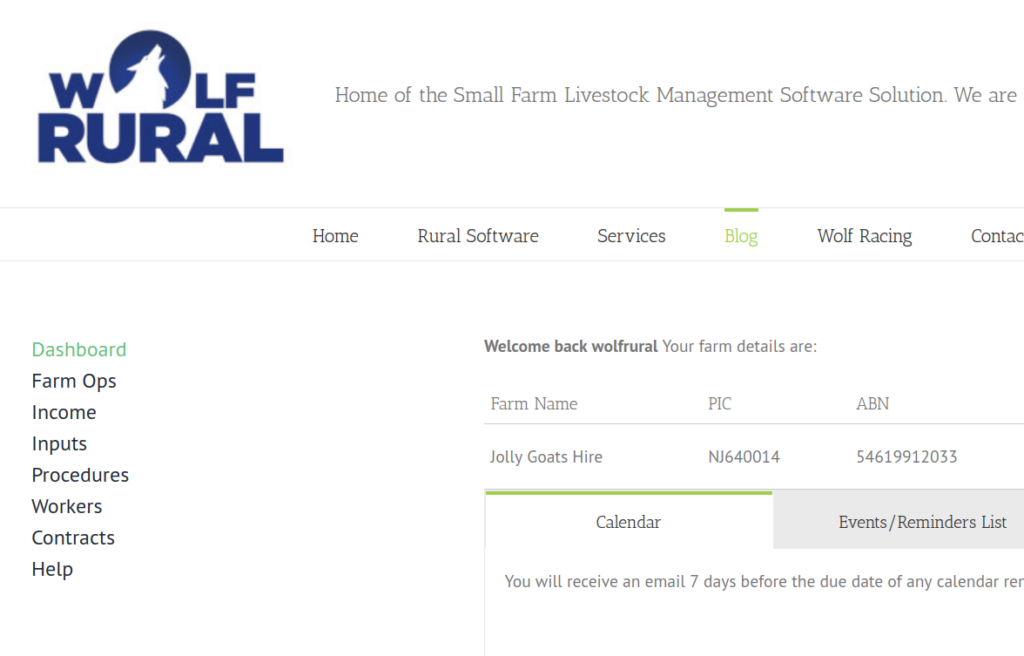
Dashboard
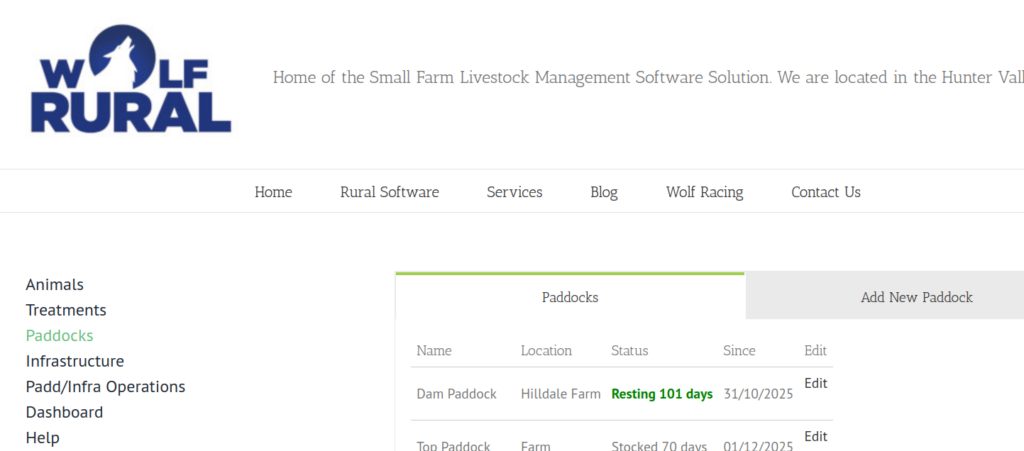
Card Functions
When you arrive at the FarmOps screen you will see a list of all of your animals that are currently marked as “Active”.
There’s a search form at the top of the screen, which allows you to see different lists based on the choices you make.
Income is obviously the opposite from Input (expenses) bu we deal with them in pretty much the same way.
All income calculations are based on the entries made in the Income Cards. For example we recently sold 10 goats for $950, so one entry was made for an Income Card to reflect this sale and we then marked all the cards of the animals as sold so they no longer appear in the standard animals list.
The Inputs Card is used to record all expenses your farm incurs. This is not an accounting system but is used to give you an clear idea what your farm’s costs are to run it, even if its a hobby only.
When entering an Input you can also record the invoice number and the supplier if you wish. Please note that for the calculation of all costings only those expenses entered as an Input are used, other values like the cost recorded on an Animal Card are for information purposes only. The reason for this is that you will often buy a mob of animals, eg we recently bought 5 goats for a total cost of $600. So the Input entered is a single record of $600, however we did record each animal a cost of $120, just so we remember when we look at the card of an animal.
If however you do want to associate an Input with a single animal then choose “Yes” as shown below:
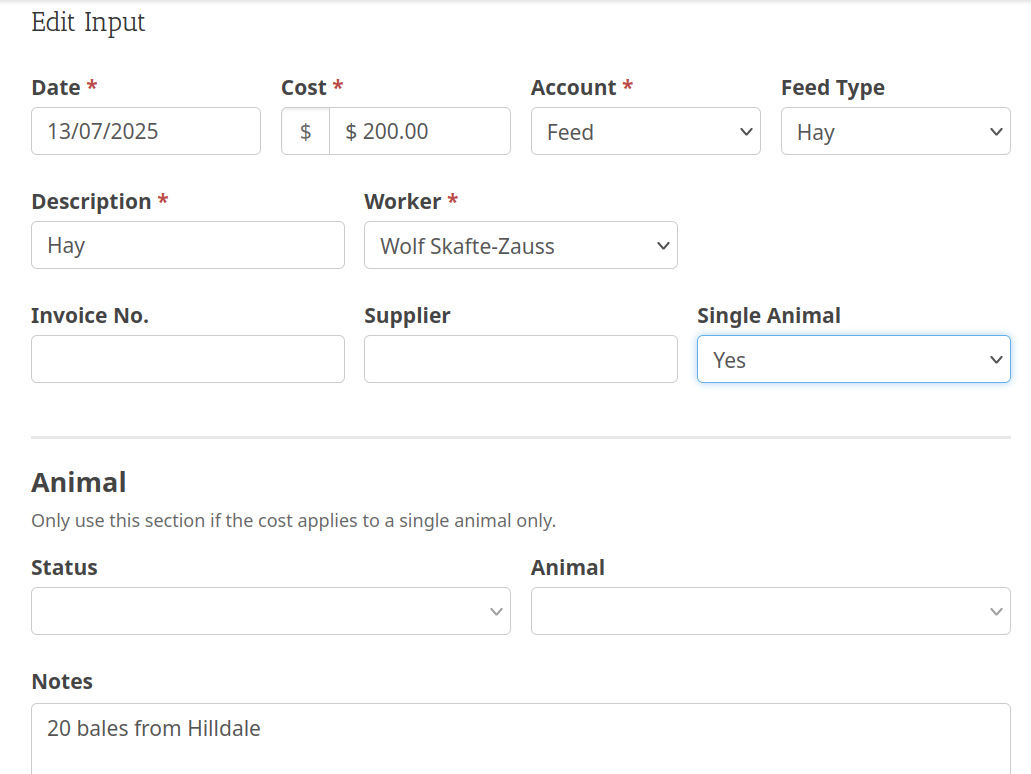
and two additional fields will appear so you can associate the cost with this expense. This might be useful for expensive treatments and or the purchase of an individual animal.
When entering an Input the “Account” dropdown will allocate it to the category the expense belongs to. Once you choose the relevant “Account” a second dropdown will appear to allow you to further narrow down the expense category for more accurate reporting. Here is a list of the “Account” dropdown items and what type of expenses typically belong in each:
- Animals – purchase, treatments, vet costs, feed etc.
- Compliance – Safety, Legal, Rates, Accounting, LLS fees such as PIC or transport books
- Equipment – services, repair, parts, fuel, registrations etc for a specific asset, eg car or tractor. I like to also add an asset called “Workshop” to allocate expenses to, which are used ongoing such as drums of engine oil, grease etc.
- Infrastructure – Paddocks, Water tanks, troughs, pipelines, Shelters, sheds, workshops etc
- Labour – Wages, contractor fees, staff training etc.
- Utilities – mains water, electricity, phone etc.
Infrastructure Overview
Infrastructure are all those things that you need to run stock, eg paddocks, shelters, water supply, troughs etc and also includes the roads that get you around your farm. So typically you would have a Infrastructure card for each major component eg Water supply, which would include dams, tanks, water troughs, pipes and so on.
When you maintain, repair or upgrade a component then add an Operation. For example if you buy a new tank to supply water to your troughs and run pipes from the tank to the troughs you would add an Operation outlining what you have done. All the costs for this project, such as the tank, piping, taps etc would be recorded as an Input this would also included any hire or contracting fees where applicable. See below for more detailed information on the paddock functionalities.
Paddocks
When you choose the Infrastructure menu you will see a table of all of your paddocks with the current resting days in different colours according to how you have set your “Minimum Rest Days” and your “Ideal Rest Days”. Assuming the defaults of of 60 and 90 days you will see for rest days:
- Green – rest is greater than 90 days
- Orange – rest is greater 60 but smaller 90 days
- Red – rest is smaller 60 days
Paddocks offer three main functions:
- You can add new paddocks as needed
- Track paddock resting and stocking days
- Track operations and Inputs to paddocks, like planting
On the Infrastructure Card you can record stock movements. To record a stock movement open the Paddock card (Farm Ops > Infrastructure > Paddocks Tab) that the stock is moving from, set the status to “Resting” and the “Since” date to when the move happened, then open the paddock card where the stocked has moved to and set it’s Status to “Stocked” and the since date to today (or whenever they moved in).
Operations are projects if you like to repair, maintain or improve infrastructure or paddocks. Please note that to record the actual costs for an operation you need to enter this as an Input. So typically you would enter all invoices incurred for an operation as inputs.
When entering an Infrastructure operation choose from the “Infrastructure”dropdown, which infrastructure item this operation is for and then from the “Type” dropdown, which kind of operation you have or are planning to do.
This is were you can record any animals that are away from your farm. In our case we hire out goats for weed control and here is were we record these details including, which animals are at that site. The two main type of contracts are were you hire your animals to someone else or you agist your animals at someone else’s paddock.
Please note that to record an expense or an income you’ll need to enter these into:
- Inputs -> for expenses or
- Income -> for moneys received
When you arrive at the treatments screen you will be presented with a list of all treatments that you have entered to date, however at the top of the screen is a search form, which you can use to limit the number of entries you are presented with. Simply enter your search criteria and click the “Search” button and the list will be updated.
Entering a Treatment
From the section drop down choose “Animals” and the Treatment drop down will display, here you can choose if this treatment is for a group of animals such as all dogs, all goats, all does etc or choose “Single Animal”.
The options that’ll display will depend on your choice:
- Group -> Group Name, enter the name of the group eg All bucks, All steers, All dogs etc.
- Single Animal -> you can now choose the Status of the animals that get displayed in the Animals drop down in, which you can now choose the specific animal the treatment applies to.